Home Remodeling Adventure: Transforming Our Upstairs
My wife and I decided to remodel the upstairs of our home this year. Our main motivator was to replace the carpet that was installed when the home was built with anything but carpet and update the overall look of the space. This included new paint, new plugs and switches, replacing traditional can lights with LED lighting, new smoke detectors, and pulling out the carpet and replacing it with laminate flooring and new baseboards. Fortunately, our downstairs is engineered hardwood, so we do not need to tackle another carpet replacement project anytime soon. We received multiple quotes for the flooring part of the project that were priced about what we expected. But somewhere along the way, my wife managed to convince me that I could do the work better than a professional. I was already entertaining the idea of doing the work myself. Having a wife who was encouraging and supportive of me learning along the way made taking on the effort less monumental.
Preparation and Planning
None of the work was particularly overwhelming mentally, although it did take me about four hundred times longer than a professional to complete the project since I was learning as I went. The part of the project I was dreading the most was the stairs. The easy way to deal with the stairs from what we were told was to carpet them. Even the professional floor installers we spoke with recommended carpet on the stairs for ease of installation. We were told many stories of the difficulty of doing the stairs since no step or riser is ever the same size. The steps, although they had their own challenges, did not consume my thoughts and planning as much as the stair skirt board did.
Creating the Stair Skirt Template
Our house did not have an existing stair skirt, and I have never built one before. The only thing I had to go on was a bunch of YouTube videos. After watching many hours of DIY stair skirt installation videos, I was certain there had to be a better way. I found there are a few popular ways to make a stair skirt template, none of which I felt comfortable with.
Many professionals seem to take the measure and cut approach. This, to me, seemed like the most difficult approach since it seemed to require about a gazillion measurements. This approach I was sure I would make a mess of.
The DIY community seems to take one of two paths when creating a stair skirt template. The butcher paper approach, where they tape long lengths of butcher paper to the walls along the stairway and let it drape down to where it falls along the steps and risers. From here they mark with a marker around the paper and cut out the shape of the stairs. The lack of rigidity in the paper seemed like there was a higher probability of things moving around and more chance of error.
The third approach seemed better than the previous two but was still not ideal. In this case, people cut and taped cardboard around the contour of the steps and risers to make a template. Again, I could see a hundred different ways I could make a mistake here.
My Solution
After studying various methods to make a stair skirt template, I had an idea for a different method, a method I thought would keep me from making a complete mess of things.
I did like the concept of the paper and cardboard methods, but there just seemed to be too much chance for error. I wanted something more rigid that could not rip or bend, messing up my cut lines.
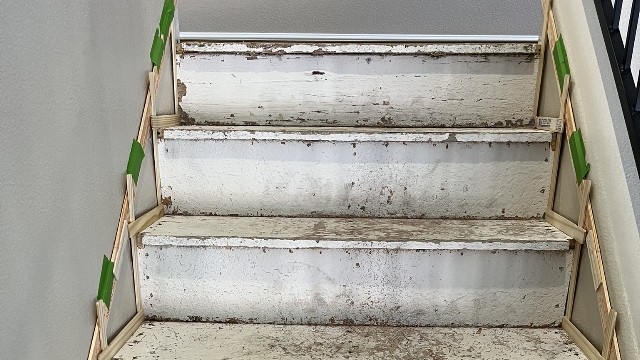
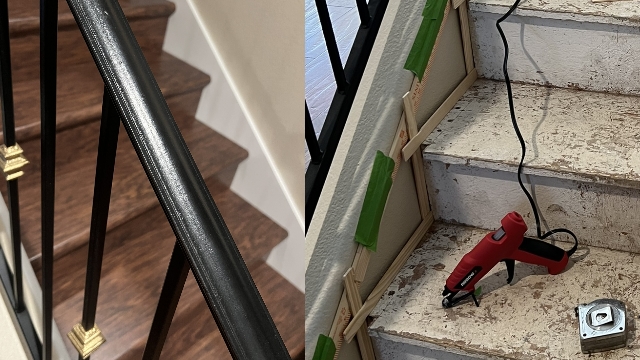
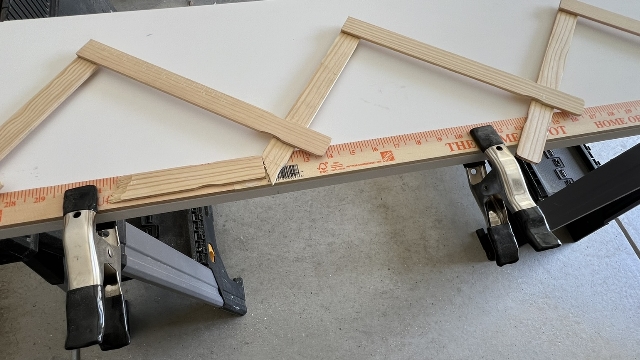
Pictured below is how I solved making a stair skirt template. Instead of paper or cardboard, I fashioned our templates out of yardsticks and paint stir sticks that were hot-glued to hold shape as I moved the template to the garage to trace the pattern on the board that would become the stair skirt.
I did use a tip I got from a YouTube guy who notched each side of the steps a half an inch (the width of the skirt board) to allow the template to fit snugly and eliminate the need to accommodate the nose of the step with the template since the stair that would be installed later would cover the notch. This was a good tip and greatly simplified things.
Conclusion
I was not initially planning on doing a how-to write-up or video, so please forgive my lack of illustrations. However, my template worked great, and I thought it might be helpful for someone else that is getting ready to tackle a similar project. The one critical part not pictured is how I started the template. The first step was to lay a 10-foot level across the top of the stairs, pushed up against the wall of the stairs. In my case, this allowed for three inches from the nose of the stairs to what would end up being the top of the stair skirt. While leaving the level secured in place, I rested the yardsticks on top of the level and taped them to the wall with frog tape. I simply placed another yardstick butted up to the first to make the run long enough. To attach the two yardsticks together, I glued a paint stir stick centered over the butt joint. Other than that, the only other helpful tip I can add is to label your templates, since not one of them will be the same.
In the end, the project was a success, albeit time-consuming. I learned a lot along the way, added some new tools to my collection and felt a great sense of accomplishment once it was finished. If you’re considering a similar project, my biggest piece of advice is to take your time and find methods that work best for you.
 Sean Boal


